Let's assume that you select Connected States in Thread view in
``Preview'', when you click on the Display buttons in the ``View
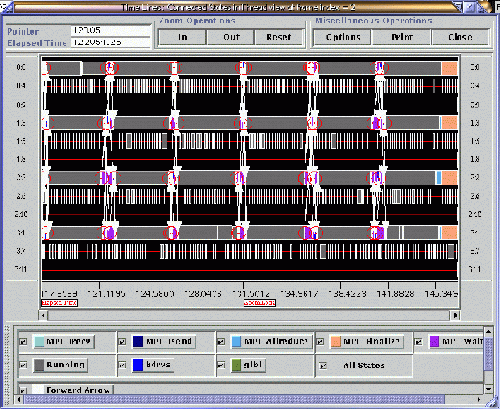
& Frame Selector'' window. A Time Lines window as shown in Figure ![[*]](crossref.gif) will pop up. The Time Lines window provides a detailed display of the sppm trace
data as a GANTT chart with the x-axis as time and the y-axis as thread ID. The
control buttons in the top panel provide zoom IN and OUT operations
around the zoom focus, which could be set by putting the cursor at the point
of interest on the GANNT chart and pressing the key ``z''. In Figure ,
the zoom focus is marked by a white line drawn from the top to the botton of
the diagram and is labeled as ZOOM LOCK in red.
will pop up. The Time Lines window provides a detailed display of the sppm trace
data as a GANTT chart with the x-axis as time and the y-axis as thread ID. The
control buttons in the top panel provide zoom IN and OUT operations
around the zoom focus, which could be set by putting the cursor at the point
of interest on the GANNT chart and pressing the key ``z''. In Figure ,
the zoom focus is marked by a white line drawn from the top to the botton of
the diagram and is labeled as ZOOM LOCK in red.
After being zoomed in several times, the Time Lines window looks like Figure
. At this resolution, many
more details are exposed. For instance, the MPI_Isend states that are in navy
blue in the figure become noticeable. Clicking on any rectangle in the Time
Lines canvas will pop up a ``Rectangle Info'' box which contains various
information regarding the subroutine call(e.g. start and end time of the call),
and various call arguments and instruction address(es) if there are any. Clicking
on the ``Rectangle Info'' box again will remove the box from the screen.
Also, clicking on the red circle at the end of the arrow will pop up a ``Arrow
Info'' box, which provides a function similar to that of ``Rectangle Info''.
In Figure , MPI_Isend, MPI_Irecv,
and MPI_Wait are all nested within the user-defined state ``bdrys''.
This suggests that ``bdrys'', which is a user-defined subroutine call,
makes all these MPI calls. Also, the regularity of the pattern of arrows can
provide insight about how data are exchanged.
Several tricks and hidden operations are worth mentioning. First, it is the
trick in locating small rectangles: since all the rectangles have a white border
surrounding them, when many small rectangles are next to each other in very
low resolution, they form a completely white rectangle. A totally white rectangle
usually means a lot more details are hidden inside. Second, a trick about scrolling:
you can drag on the scroll tab to advance to later time, but scrolling becomes
slow when there are many threads with a lot of objects. In this case, click
on the white space between the scroll tab and the end arrow tab in the direction
that you want to advance to. The operation will allow the next time frame in
the canvas to be redrawn immediately. Third, the label of the y-axis in Thread
view is (MPI-rank, local thread ID), but it is different in different views.
Because of the limited space on the canvas, the label of the y-axis is actually
written in the tooltip of the two vertical y-axis label. The tooltip can be
activated by simply putting the cursor over any y-axis integer doublet for few
seconds. Fourth, doubly clicking on any integer doublet label will invoke the
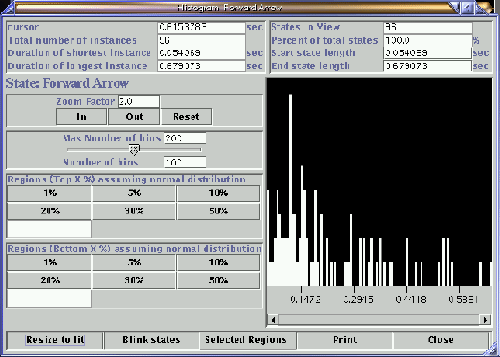
``Time Lines Manipulation'' window as shown in Figure .
This window provides various operations on the selected time line, for instance,
the adjustment of time line by changing the offset of the time line for alignment
of rectangles, or the swapping of different time lines for organizational purposes.
.
The Histogram window provides basic statistics and statistical distribution
of the duration of the selected state. The ``Blink States'' button enables
the selected state/arrow in the Time Lines window to flash. Again the goal is
to help highlight the objects. Finally, we note that the memory demand for Time
Lines window is very high, especially on Linux box with JDK-1.1(running green
thread). Our experience indicates that the amount of X server memory needed
to have one instance of Time Lines window running is proportional to the size
of the Time Lines window and the color depth of the X server. If one plans to
run multiple instances of Time Lines windows at the same time, be sure to have
enough physical memory for the X server and Java Virtual Machine.